 Ever since Mac OS X Leopard, connecting an external storage device to your Mac will ask you if you want to use that storage to automatically back up all of your files with a feature called Time Machine. However, Time Machine can also be configured to back up to storage elsewhere on your network and not directly connected to your computer.
We’re going to use a Raspberry Pi (I used an old Model B) as a cheap alternative to a dedicated Network-attached Storage (NAS) device for use with Time Machine. I’m going to use an external hard drive connected via USB but the same principles should apply to any storage available to the Raspberry Pi.
- Software dependencies
- Readying our storage
- Configuring Samba
- Configuring Avahi
- Accessing your backups in the Finder
Software dependencies
First, ensure you’re using a recent version of Raspbian so we can rely entirely on Debian packages already built for your Raspberry Pi and avoid compiling software ourselves (which can take quite some time on older models). If not, please see the official documentation for installing a Raspberry Pi operating system image on an SD card. At the time of writing, I used the September 2019 version of Raspbian Buster with a kernel version of 4.19.
With Raspbian up and running, let’s install the two packages we’re going to need: Samba and the Avahi daemon.
pi@raspberrypi:~ $ sudo apt install samba avahi-daemon
Samba is an open source implementation of the SMB file sharing protocol which is officially supported by Time Machine for backing up over a network. This is all we really need to back up to storage attached to our Raspberry Pi but we can make it slightly easier to set up on the macOS end by also using Avahi’s implementation of the mDNS/DNS-SD protocol (sometimes called “Bonjour”) to make our Time Machine share automatically discoverable on our network. This way we don’t need to manually connect to our Raspberry Pi from our Mac, it will automatically appear both in the Finder’s sidebar and in the Time Machine System Preferences.
It’s important to have a recent version of Samba so that we can benefit from the latest support for macOS-specific extensions. At the time of writing, the versions I used were Samba 4.9.5-Debian and avahi-daemon 0.7.
Note that we are not using Netatalk as we want to use SMB rather than AFP for file sharing as that seems to be the preferred file sharing protocol for network-attached storage in Apple’s current documentation.
Readying our storage
With our dependencies in place, let’s ready our storage. If you have this set up already, please feel free to skip ahead to Samba configuration.
I use a cheap USB enclosure with a 500 GB hard disk inside and I want to use the whole disk for Time Machine. Connecting it to my Raspberry Pi makes it instantly discoverable with blkid which will print attributes for all connected block devices:
pi@raspberrypi:~ $ sudo blkid
/dev/mmcblk0p1: LABEL_FATBOOT="boot" LABEL="boot" UUID="3725-1C05" TYPE="vfat" PARTUUID="d565a392-01"
/dev/mmcblk0p2: LABEL="rootfs" UUID="fd695ef5-f047-44bd-b159-2a78c53af20a" TYPE="ext4" PARTUUID="d565a392-02"
/dev/sda: UUID="e613b4f3-7fb8-463a-a65d-42a14148ea65" TYPE="ext4"
/dev/mmcblk0: PTUUID="d565a392" PTTYPE="dos"
The key entry here is /dev/sda: that’s my USB drive and its unique UUID I can use when configuring it.
As the TYPE="ext4" in the output reveals, I’ve already formatted it with the default Linux ext4 journaling file system but let’s do it again for good measure:
pi@raspberrypi:~ $ sudo mkfs -t ext4 /dev/sda
We’re making a trade-off here: using ext4 means we won’t be able to plug our drive directly into a Mac and read and write to it but we benefit from the reliability of a journaled file system. If we used Apple’s HFS+ instead, we would be able to plug our drive directly into a Mac but we would have to disable journaling thereby losing write safety. As the integrity of our backups is paramount and as long as we are happy doing both back ups and restores over our network, ext4 seems a good compromise between convenience and safety.
Note this isn’t an encrypted file system so anyone can read anything written to it. We could use Linux Unified Key Setup to avoid this but Time Machine will store any network backups in a sparse image which can itself be encrypted. To simplify setup, let’s rely on Time Machine’s encryption to keep our backups secure and leave our underlying storage unencrypted.
Now we want to mount this filesystem on our Raspberry Pi so that we can access it like any other directory. Let’s do this and ensure that the mount persists whenever the Raspberry Pi restarts by appending an entry to the fstab:
pi@raspberrypi:~ $ echo 'UUID=e613b4f3-7fb8-463a-a65d-42a14148ea65 /media ext4 noexec,nodev,noatime,nodiratime 0 0' | sudo tee -a /etc/fstab
This instructs our Raspberry Pi to mount the drive identified by the given UUID (which we got earlier when calling blkid) at the directory /media as an ext4 filesystem with a variety of flags:
noexec: do not allow direct execution of any binaries on the mounted filesystem as it’s only going to be use for backup storage;nodev: do not interpret character or block special devices on the filesystem;noatime: do not store access times on this filesystem;nodiratime: do not store directory access times on this filesystem.
(Update: I previously recommended using the sync flag but Dries Oeyen pointed out this typically has a big impact on performance and the ext4 filesystem doesn’t support it, instead preferring the use of commit=nrsec to specify a number of seconds after which data and metadata will be synchronised.)
The two numbers at the end of the line instruct your Raspberry Pi to ignore this filesystem when using dump and not to check it with fsck when rebooting.
I’m using /media because I have no other storage attached to my Raspberry Pi but you could use any directory of your choice.
Now we can actually mount the filesystem based on the definition we just added to our fstab:
pi@raspberrypi:~ $ sudo mount /media
This allows us to now read and write files on our freshly formatted USB drive.
Let’s create a separate user for storing backups to match the one on my Mac:
pi@raspberrypi:~ $ sudo adduser mudge
Let’s store all our backups in a new directory and assign ownership of the entire disk to this new user:
pi@raspberrypi:~ $ sudo mkdir /media/backups
pi@raspberrypi:~ $ sudo chown -R mudge: /media
As I’m using a spinning disk and Time Machine doesn’t run constantly, it’d be nice if we could put the disk in standby after 10 minutes of inactivity. To do this, we’ll need to install hdparm to set a standby (spindown) timeout in 5 second increments, again identifying our disk by its UUID:
pi@raspberrypi:~ $ sudo apt install hdparm
pi@raspberrypi:~ $ sudo hdparm -S 120 /dev/disk/by-uuid/e613b4f3-7fb8-463a-a65d-42a14148ea65
We can make this permanent by adding the following stanza to /etc/hdparm.conf:
/dev/disk/by-uuid/e613b4f3-7fb8-463a-a65d-42a14148ea65 {
	spindown_time = 120
}
Configuring Samba
Now that we have storage available to share with our Mac, let’s set it up with Samba so that it will work with Time Machine.
To do this, we need to add a new share definition for our directory at /media/backups owned by the user mudge to our Samba configuration in /etc/samba/smb.conf:
[backups]
    comment = Backups
    path = /media/backups
    valid users = mudge
    read only = no
    vfs objects = catia fruit streams_xattr
    fruit:time machine = yes
This creates a new share called backups which can only be accessed by using the mudge username and password.
The key configuration for Time Machine are the last two lines which enable Samba’s enhanced macOS interoperability module.
So that we can connect to the share as mudge, we need to explicitly add that user to Samba’s password file and set a password with smbpasswd:
pi@raspberrypi:~ $ sudo smbpasswd -a mudge
We can now use this username and password from macOS to connect to our backups share.
With these changes in place, we can now run testparm to check our configuration is free of errors and reload our Samba configuration:
pi@raspberrypi:~ $ sudo testparm -s
pi@raspberrypi:~ $ sudo service smbd reload
At this point, we could manually connect our Mac to the share by choosing Connect to Server... or pressing Command-K in the Finder, entering the IP address of our Raspberry Pi, e.g. smb://192.168.1.104/backups and authenticating with our user credentials. This would then become available in the Time Machine Preference Pane as a backup destination when you choose “Select Disk…”.
However, we can make this even easier by also setting up autodiscovery of our share with Avahi.
Configuring Avahi
 Now that Samba is configured, let’s use Avahi to advertise it to Macs on our network. While Samba can do this itself if it is built with mDNS support, the version currently available for Raspbian does not have this functionality so we’ll have to do it ourselves based on the Samba source code.
We’re going to have to add a new Avahi service to /etc/avahi/services/samba.service which describes the two things described in Apple’s documentation for advertising Time Machine availability through Bonjour:
- That we are running an SMB server on port 445;
- That we have an SMB share point available for Time Machine.
As a bonus, we’re also going to advertise our Raspberry Pi as a now-defunct AirPort Time Capsule so that it appears as such in the Finder.
<?xml version="1.0" standalone='no'?><!--*-nxml-*-->
<!DOCTYPE service-group SYSTEM "avahi-service.dtd">
<service-group>
  <name replace-wildcards="yes">%h</name>
  <service>
    <type>_smb._tcp</type>
    <port>445</port>
  </service>
  <service>
    <type>_device-info._tcp</type>
    <port>9</port>
    <txt-record>model=TimeCapsule8,119</txt-record>
  </service>
  <service>
    <type>_adisk._tcp</type>
    <port>9</port>
    <txt-record>dk0=adVN=backups,adVF=0x82</txt-record>
    <txt-record>sys=adVF=0x100</txt-record>
  </service>
</service-group>
Let’s take a look at each service individually:
<service>
  <type>_smb._tcp</type>
  <port>445</port>
</service>
This advertises our SMB server on port 445.
<service>
  <type>_device-info._tcp</type>
  <port>9</port>
  <txt-record>model=TimeCapsule8,119</txt-record>
</service>
This advertises our Raspberry Pi as an AirPort Time Capsule but you can use any device model name found in /System/Library/CoreServices/CoreTypes.bundle/Contents/Info.plist, e.g. MacBook, Xserve, Windows, etc.
We use port 9 for both this and the next service as it is the port used by real Time Capsules and any data sent to it is discarded by definition.
<service>
  <type>_adisk._tcp</type>
  <port>9</port>
  <txt-record>dk0=adVN=backups,adVF=0x82</txt-record>
  <txt-record>sys=adVF=0x100</txt-record>
</service>
This is the crucial part that advertises our specific backups share as a Time Machine-compatible “AirDisk” and it consists of two parts:
<txt-record>dk0=adVN=backups,adVF=0x82</txt-record>
Advertise a share named backups (this must match the name of your Samba share) which has the following two AirDisk volume flags set:
0x0002: SMB is supported on this volume;0x0080: Time Machine should allow this SMB volume as a backup destination.
Together, these make the single hex value string of 0x82.
The second part sets system-wide volume flags of 0x100 so that connecting to our share prompts for a username and password:
<txt-record>sys=adVF=0x100</txt-record>
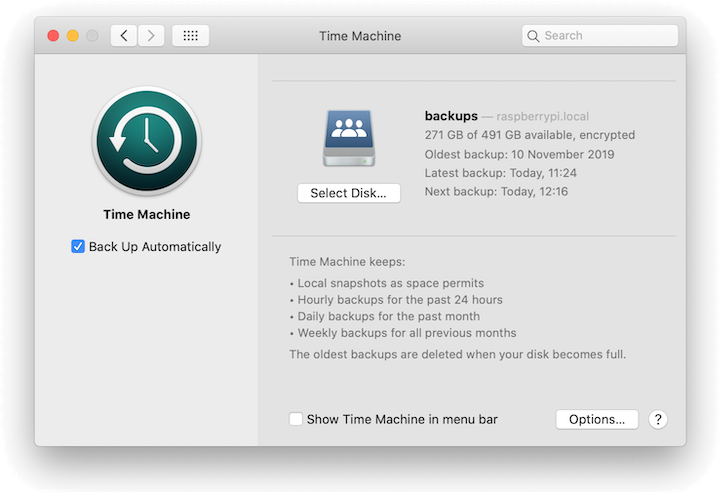
With this service file in place, Avahi should automatically pick up the configuration change and your Raspberry Pi will now appear in the Finder and in the Time Machine Preference Pane when you choose “Select Disk…”.
Ensure that you check “Encrypt backups” when selecting the disk and wait for your first backup to complete!
Accessing your backups in the Finder
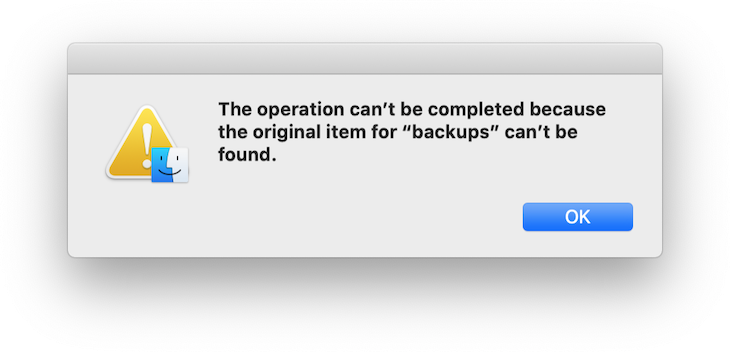 Note that choosing your Raspberry Pi in the Finder will initially connect as a guest (as indicated by
 Connected as: Guest in the Finder window) and your backups share will be visible there. However, attempting to open the share will fail with a puzzling error message stating that your share can’t be found. This is because you need to explicitly connect as the appropriate user (mudge, in my case) by choosing Connect As... in the Finder.
Once you do that, you should be able to see your backups stored as a sparse image with a .backupbundle extension.
If you have any trouble connecting (especially if you have changed your user credentials at all), it’s worth using the Keychain Access application in /Applications/Utilities to check for any cached network passwords and delete old entries. You may also need to forcibly relaunch the Finder by holding down the Option key and right-clicking on its icon in the Dock and choosing the Relaunch option at the bottom of the resulting menu.